These instructions were translated from German with the help of DeepL. Here you can find the German Version.
Italien Version (available soon)
French Version (available soon)
1. Preliminary remarks
These instructions should allow KiT authors to create and format contributions completely independently. It will be updated and amended at irregular intervals. KiT publications published up to this point will not be adapted accordingly and therefore correspond to the specifications of older versions of the manual.
Texts in the KiT series should always be written directly in this WordPress installation. We strongly advise against writing texts in word processing programmes such as Microsoft Word or similar and then copying/pasting them into a KiT article, as this creates considerable post-editing work.
The authors of articles in the KiT series undertake to comply with the generally applicable rules of good scientific practice. The relevant guidelines of the German Research Foundation (DFG) are authoritative: https://doi.org/10.5281/zenodo.6472827. Particular attention is drawn to the obligation to respect the copyrights of third parties and to carefully cite all sources used in the preparation of the texts.
2. Registration/login for WordPress
Go to the KiT website (<http://www.kit.gwi.uni-muenchen.de/>) and log in there. If you do not yet have a user account, please click on "Register" (<https://www.kit.gwi.uni-muenchen.de/wp-login.php?action=register>). Once you have registered, please send an e-mail to <KiT_signup@itg.uni-muenchen.de> and wait for confirmation that your account has been added to the "Authors" group. You can then log in with your user name and password by clicking on "Login".
3. Create content
3.1. Contributions/Articles
3.1.1. What is the content format 'contribution/article' suitable for?
Texts of less than 20,000 words (not including the bibliography) can only be published as KiT 'articles'. The number of words in a post is automatically and continuously counted by WordPress and displayed at the bottom of the editor window (the number before "WORDS" is binding). Apart from the general thematic framework applicable to the KiT series, there are no article-specific content requirements. Articles should not be longer than 30,000 words. Beyond this limit, the publication format 'volume' must be chosen.
3.1.2. Create new contributions
- Go to "Posts/Articles" and click on "Create".
- Enter the title of your post in the "Enter title here" field. The title can be changed at any time. Now you can write your text in the field that appears under the "Post" tab. You can also format the text using the menu bar (font size, numbered bulleted lists/with bullet points, links, tables, etc.).
- To enter an abstract, please click on the "Abstract" tab and enter your text there.
- If the article is part of an edited volume, select the corresponding volume on the right under "Volumes".
- IMPORTANT: The article must be saved before you change/leave the page. To do this, click on "Save" on the right or, if the article has already been published, on "Update". Changes to posts are NOT saved automatically! It is also advisable to save the post occasionally while you are working on it. On the other hand, this should not be done too often as it puts a strain on the system. We recommend a saving rhythm of approx. 30 minutes.
For each contribution - regardless of whether it is part of an edited volume or a stand-alone article - an abstract in English must be written and entered in the abstract form.
3.2. Volumes
3.2.1. What is the "volume" content format suitable for?
Texts comprising at least 20,000 words (excluding bibliography) can be published as KiT 'volumes'. This limit does not necessarily apply to anthologies, although the corresponding minimum volume size should be aimed for in relation to the total sum of all individual contributions.
3.2.2. Creating a new monograph
- Go to "Volumes" and click on "Create new volume".
- Enter a title and select the language in which the text of the volume will be written.
- Enter an English version of the title in the field provided; the English title is important as it will be included in the machine-readable metadata schema of the article.
- Select the entry 'Monograph' in the 'Type' input field.
- Entering a subtitle is optional.
The individual chapters of a monograph should be divided into several 'sub-windows' provided for this purpose in the editor.
A KiT volume number is assigned by the editors as soon as the content of the volume has been finalised. The same applies to the entry of the year and place of publication. An ISBN can be assigned once the volume has been finalised. The publishers of the series must be informed of the corresponding request. They will then request an ISBN for the volume from the 'Electronic Publishing Department' of the LMU University Library.
3.2.3. Creating a new anthology
The creation of a new edited volume is largely analogue to the procedure for creating a new monograph. The decisive difference is the selection of the entry 'Anthology' in the selection field 'Type'.
The authors of the individual contributions to the anthology write their texts as KiT articles, which can then be assigned to the anthology via the corresponding selection field. In order to be able to use a post as part of an anthology, the post must be assigned to the anthology in the "Volumes" selection field (see DEFAULT).
3.3. Further authors
A contribution or volume can only be edited by the person who created it. Additional authors can be added by the editors. In exceptional cases, it is also possible to assign authors without their own KiT account so that they can be displayed accordingly on the interface.
4. Composing texts
4.1. General information about the WordPress editor
WordPress uses a visual editor whose operation is similar to that of word processing programmes; the result is an HTML-annotated text (see below for the "Text" view), which contains the formatting information (e.g. <p> tags around each paragraph).
The labelling of the text should be purely structural, the presentation is separate from this and takes place in a further step during the transformation of the HTML text code on the website (front end) with style sheets or via a transformation script into TeX format (PDF) and can be adapted at any time. Therefore, for example, no font should be defined, this is done globally for the post via CSS/LateX definition. The visual editor itself displays the HTML-annotated text already partially formatted with its own stylesheets; however, this does not have to correspond 1:1 to the formatting in the frontend/view upon publication.
In order to obtain a correspondingly cleanly annotated HTML code, you should therefore also avoid copy&paste from Word etc. or first copy the content into a pure text editor and then copy the result into the WordPress editor. Otherwise, formatting will be inserted that is not necessarily visible in the visual editor, but which will lead to problems when further processing the HTML code.
If no text editor is used as an intermediate step, the "DELETE FORMATTING" function in the editor (under > Format) must be applied to the text marked with Ctrl-A and care must be taken not to insert any superfluous style information afterwards (visible in the "Text"/HTML view as "<span style=...").
If problems occur, it is always advisable to take a look at the "Text" view of the editor, which displays the HTML code that forms the basis of the display in the frontend (see the "Visual" and "Text" tabs at the top right of the editor window). Changes in the "Text" view should be made very carefully as, for example, failure to observe the HTML syntax rules can have undesirable effects in the frontend.
The full-screen mode under 'View' is recommended for distraction-free writing.
4.2. Use of shortcodes
A WordPress-specific shortcode syntax is used to call certain functions (e.g. inserting bibliographic information for references, see below). Shortcodes have the following schematic structure:
[shortcode attribute=attributevalue]
In KiT, self-defined shortcodes are used for setting bibliographical references and notes/footnotes, among other things.
4.3. Adding media (text files, images, audio, video, etc.)
4.3.1. General information
Click on the "Add files" button above the text input field and upload the desired file to the KiT media centre. In addition to text documents in various formats (.txt, .docx, .xls, .pdf etc.), image, audio and video files are also possible (for formatting of images in particular, see the 'Images' section below).
The integration of files containing computer code (.js, .py, .sql, etc.) may be problematic. The system prevents such files from being uploaded for security reasons. The only solution in these cases is to convert the files in question into ZIP archives. These can then be easily transferred to the KiT media library.
The width of a video can only be adjusted in text mode by changing the "width" attribute of the shortcode automatically created by WordPress:
[video width="300" height="1920" mp4="http://www.kit.gwi.uni-muenchen.de/wp-content/uploads/Sample_video.mp4"][/video]
The value of height is automatically adjusted so that the original proportions of the video window are retained. Changing the value of 'height' has no corresponding effect.
Example of an mp4 video. Author: Camille Brodard (Download from https://www.pexels.com/videos/ on 2022-11-18. Licence: https://www.pexels.com/license/ ('All photos and videos on Pexels are free to use. - Attribution is not required ... - You can modify the photos and videos from Pexels. Be creative and edit them as you like.')
A minimised audio player (start or stop button only) can be created if the attribute format="min" is added to the audio shortcode automatically generated by WordPress in text mode.
[audio format="min" wav="http://www.kit.gwi.uni-muenchen.de/wp-content/uploads/A_Genova.wav"][/audio]
4.3.2. Licence regulations regarding media files
All files uploaded to the media library by the author are automatically placed under the latest valid version of the CC BY-SA licence, currently 4.0 International (https://creativecommons.org/licenses/by-sa/4.0/). The author is deemed to be the copyright holder. In cases where the author cannot claim copyright, authorship and the applicable licence must be stated separately. To do this, after uploading the media files in question, click on their preview image under the "Media library" tab and uncheck the "Own image" box under "Attachment details" on the right-hand side. Text fields will appear in which you can enter the above information. The following fields must be filled in:
- Author of the file
- Origin of the file (URL if possible)
- Date the file was downloaded from the source URL
- Licence to which the use of the file is subject
4.4. References within a KiT contribution
4.4.1. Chapter
To refer to a chapter, a label must first be assigned to the chapter. To do this, the shortcode "label" is inserted after the (sub)heading, e.g.
[label key="general"]
The shortcode is best placed directly in the line below the heading, but it must not be part of the heading itself. The key attribute should only consist of letters and numbers. Spaces should be avoided, but can be replaced by hyphens or underscores.
You can then use the ref shortcode to refer to the relevant chapter:
[ref key="general"]
The abbreviation "ch." is used by default; you can specify your own abbreviation as follows:
[ref key="conceptdesignations" pre="Chapter"]
4.4.2. Figures, iFrames and tables
For the reference to an image, an iFrame or a table, the label shortcode is inserted within the corresponding signature. Otherwise, the usage is identical.
4.4.3. Paragraphs
The [pref key="..."] shortcode can be used to refer to a paragraph. Otherwise, it is used in the same way as the other reference mechanisms; in particular, the label shortcode is also used to determine the target of the reference. The label can be located anywhere within the respective paragraph. All other text components such as lists, images etc., which are numbered like text paragraphs, can also be referenced in this way. This means, for example, that a label in a caption (in this case [label key="figure_test"]) can in principle be referenced with ref, but also with pref (even if this is not necessarily advisable):
[ref key="figure_test"] and [pref key="figure_test"]
Result:
4.5. Notes/Footnotes
The shortcode for annotations is inserted into the text in the editor using the corresponding "Annotation" button. In the frontend, the content is displayed via mouseover and also set as a linked endnote; in the LateX-generated PDF document, they are set as footnotes.
annotated text[note]This is a remark.[/note]
This example results in: annotated text1
In principle, it is also possible to insert footnotes with the shortcode [note content="remark"]. However, this leads to various problems, e.g. with inverted commas in the footnote text, and should therefore be avoided. In principle, all footnotes must be specified either with [note]...[/note] or with [note content="..."]; both variants in the same text result in the article being formatted incorrectly.
Footnote characters are written after a punctuation mark if the content of the footnote refers to the (partial) sentence before it. If the footnote content only refers to the word immediately before a punctuation mark, the footnote character is written before the punctuation mark.
4.6. Norm data
Make use of the option to link text content with standardised data. Priority should be given to the so-called QIDs of the Wikidata project. In recent years, Wikidata has developed into a kind of "standardisation data hub", which forms a bridge to other standardisation data systems such as the Common Authority File (GND) of the German National Library (DNB), GeoNames and many others by registering the corresponding third-party IDs (see the "Identifiers" section on the Wikidata objects pages; the corresponding Wikidata properties. Example of a corresponding 'property': https://www.wikidata.org/wiki/Property:P1566). To link a word or a text passage, the address of the corresponding Wikidata data object should be stored as a hyperlink. In the case of the German National Library, this would be: https://www.wikidata.org/wiki/Special:EntityPage/Q27302.
4.7. Concepts and designations
To differentiate between concepts and designations, concepts must be labelled as such using the shortcode "[concept qid=...]...[/concept]". Marking as a concept can also be done in the editor by marking the concept in the text and then clicking on "Concept" in the editor menu. In the editor, concepts can be written in the usual way. They appear in capitals in the frontend. Similarly, terms must be marked with the shortcode "[term lid=...]...[/term]". Designations are automatically italicised in the frontend. The qid and lid attributes refer to Wikidata standard data objects. In the case of concepts, these are "Wikidata Q identifiers", in the case of designations, the Wikidata LIDs (see https://www.wikidata.org/wiki/Wikidata:Lists/lexemes). The assignment of QIDs and LIDs is optional. If a QID or LID is specified for concepts and descriptions, they are automatically stored in the frontend with a link to the respective Wikidata data object.
Example:
Editor view (the direct link to the Wikidata pages is optional):
In French, the [concept qid=Q18674606]apple[/concept] is referred to by the word [term lid=L15282]pomme[/term], whereas in German it is referred to as [term lid=L819]Apfel[/term].
Front end:
In French, the apple is called pomme, whereas in German it is called Apfel.
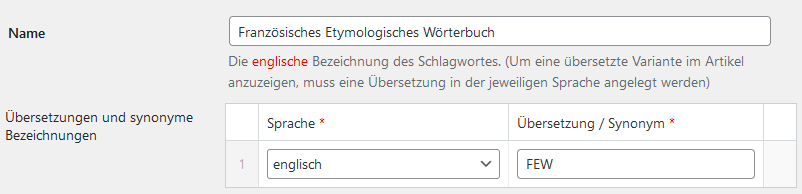
4.8. Keywording
Each article must be provided with keywords before publication. Keywords consist of at least the English name of the term (= concept) and the corresponding entry in the Wikidata knowledge database. Additional synonymous terms or translations in other languages can also be entered. Established abbreviations such as "FDM" for "research data management" are also possible. It is recommended to at least create translations in the respective language of the article in which the keywords are used.
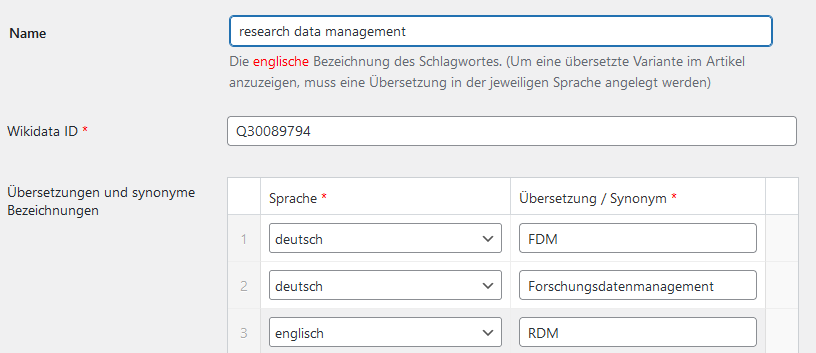
Existing keywords can be added (and removed) to an article or volume using the "Keywords" menu item on the right-hand side of the editor window. The search always takes into account all English terms and (if available) the translations in the article language.
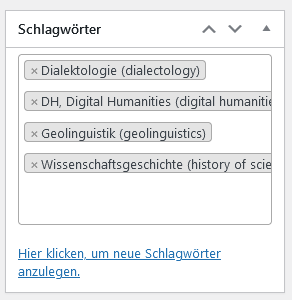
Menu item for adding keywords
At the end of the selection list there is also a link to create new keywords. Here you can also add further translations to existing keywords, for example.
For proper names that are not translated into other languages, please only ever create English-language entries (including for any variants or abbreviations), even if the name is actually in another language:
4.9. Gender-appropriate language
Gender-neutral language should be used in KiT contributions. The following scheme applies:
Autor*innen
The "i" after the asterisk should always be written in lower case.
5. Bibliography system
KiT has a central bibliography system that is shared by all authors and can also be expanded. A dialogue box below the editor window of each article allows you to select titles that already exist in the central bibliography and add them to the specific bibliography of an article. Titles not yet in the central bibliography can be newly entered there. They are added to the central bibliography and can then be added by all KiT authors to their article-specific bibliographies.
5.1. Set up and maintain contribution-specific bibliography
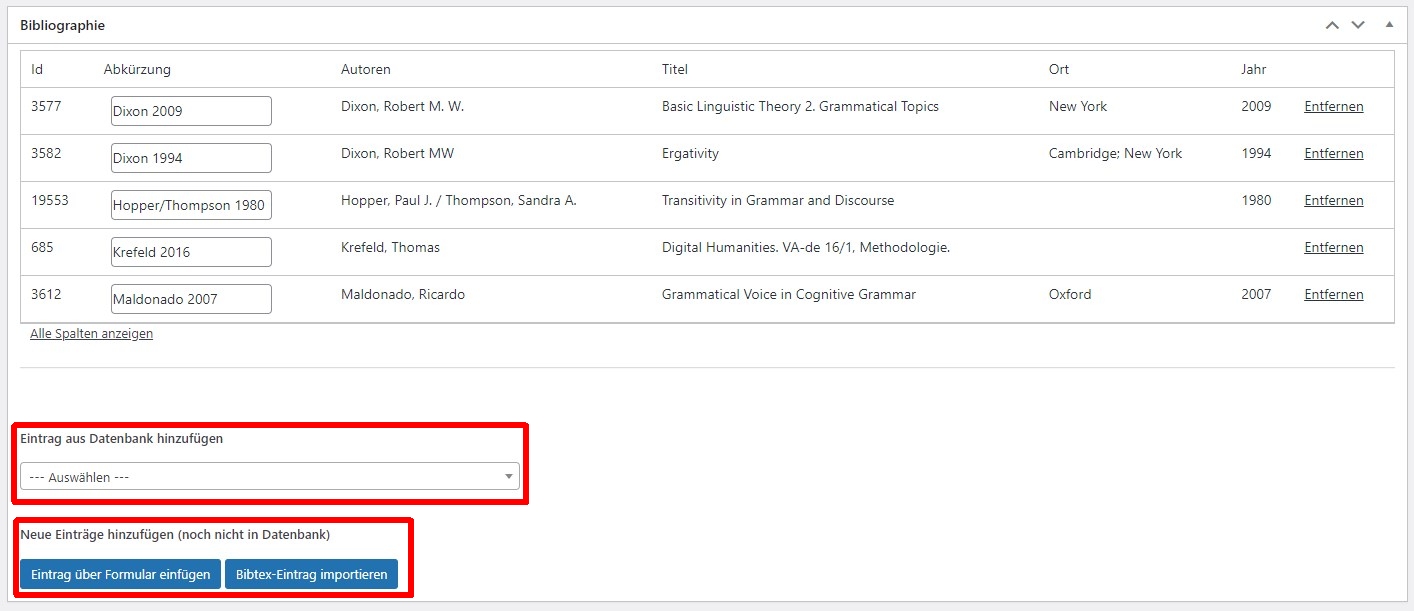
Bibliography system dialogue box (below the editor window) for managing the article-specific bibliography
The abbreviations suggested by the system can be changed manually. These changes are contribution-specific and have no effect on the central KiT bibliography.
New titles can be entered either using a form or by importing a bibliography in BibTeX format. Examples of the BibTeX format:
MONOGRAPHY:
@book{dixon2009,
    author = {Dixon, Robert M. W.},
    year = {2009},
    title = {Basic Linguistic Theory 2. Grammatical Topics},
    publisher = {Oxford University Press},
    address = {New York},
  }
ARTICLE:
@article{hopper1980,
   title = {Transitivity in Grammar and Discourse},
   author = {Hopper, Paul J. and Thompson, Sandra A.},
   journal = {Language},
   volume = {56},
   number = {2},
   year = {1980},
   pages = {251--299},
 }
ARTICLE in COLLECTED VOLUME / BOOK SECTION (with own title):
@incollection{maldonado2007,
   address = {Oxford},
   title = {Grammatical Voice in Cognitive Grammar},
   booktitle = {The {{Oxford}} Handbook of Cognitive Linguistics},
   publisher = {{Oxford University Press}},
   author = {Maldonado, Ricardo},
   editor = {Geeraerts, Dirk and Cuyckens, Hubert},
   year = {2007},
 }
WEBSITE:
@misc{krefeld2016,
    author = {Krefeld, Thomas},
    url = {https://www.verba-alpina.gwi.uni-muenchen.de/?page_id=493&db=161&letter=D#14},
    note = {Abgerufen am: 21.12.2016},
    title = {Digital Humanities. VA-de 16/1, Methodologie.},
}
BibTeX can be generated by reference management programmes such as Zotero, for example, or output during a search, e.g. via Google Scholar. In this case, the information should always be checked and supplemented if necessary. Useful tools for generating the BibTeX format are:
Please be very careful when entering new titles. Once the bibliographic details have been transferred to the central KiT bibliography, they can only be changed by the system administrators or editors. The reason for this is that subsequent changes affect all contribution-specific bibliographies that have adopted a corresponding title.
The bibliography at the end of the post is automatically generated on the basis of the bibliographic entries entered for a KiT post (bibliography).
5.2. Insert a bibliography in an article
To insert a reference to one of the bibliographical references in the text of a KiT article, click on the "Bibliographical reference" menu item at the top of the editor window. The dialogue box offers various options, which are then translated into so-called shortcodes.
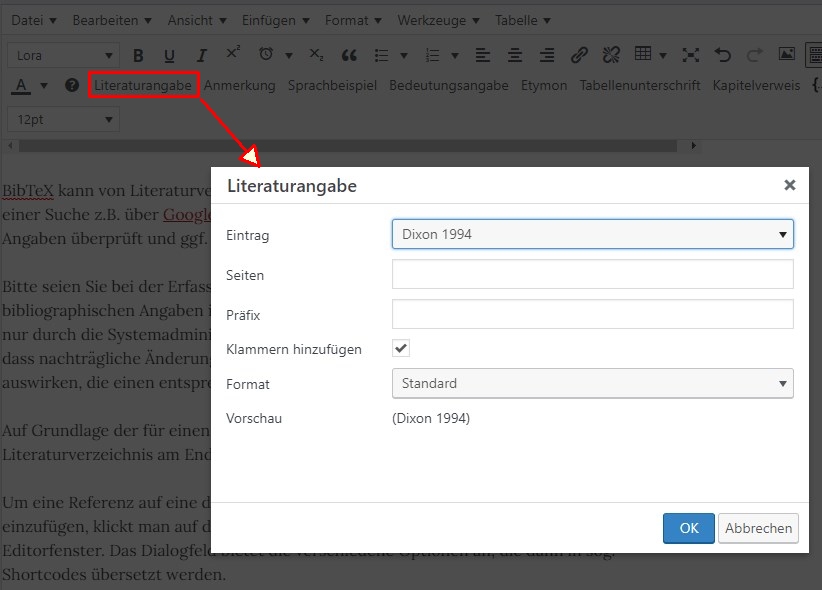
Dialogue box for inserting a literature citation
The display of a reference can be customised at any time by clicking on the element in the visual editor.
6. Citations
Literal in-text quotations are placed between double inverted commas. Single inverted commas are used if a distance is to be indicated.
Block quotations are tagged with the "Quote" button of the editor, these are also set accordingly.
Example of a block quote.
When citing monographs, anthologies or articles in continuous text without an interactive reference to the article-specific bibliography, the respective titles are placed between double inverted commas ("). Example:
Dixon, Robert M. W. (2009): "Basic Linguistic Theory 2. Grammatical Topics." New York: Oxford University Press.
7. Formatting texts
The standard HTML format classes in the WordPress editor are used for formatting. The layout of volumes and articles can only be changed individually according to the authors' ideas within very narrow limits, as a uniform appearance is essential for the recognition value of the publication series.
7.1. Headings
The same for all primary literature types (article / monograph / volume chapter). As a post, a volume chapter has the same structure as a stand-alone post. The chapter numbering level is then inserted when the volume is created as a PDF with LateX. It is visible online via the parent volume, the title in the frontend and the outline menu in the sidebar.
Always use the 'Paragraph' drop-down menu in articles and chapters to mark headings. Always use the category 'Heading 1' to mark the top level of the hierarchy. The presence of at least one chapter heading in this category is a prerequisite for creating the interactive table of contents on the right-hand side of the text display in the frontend.
- Title heading (h1-entry-title) = title (= post title)
- h1-heading: 1st outline level (1)
- h2-heading: 2nd outline level (1.1)
- h3 heading: 3rd outline level (1.1.1)
- h4 heading: 4th outline level (1.1.1.1)
- (h5 = bibliography, is set automatically)
- h4 heading: 4th outline level (1.1.1.1)
- h3 heading: 3rd outline level (1.1.1)
- h2-heading: 2nd outline level (1.1)
- h1-heading: 1st outline level (1)
7.2. Lists
Lists can be inserted into a text using the two corresponding menu elements at the top of the editor window. Both numbered and unnumbered lists are possible; a selection of different numbers and list symbols is available. It is possible to convert list-type text into an HTML list at a later stage. To do this, the corresponding text must first be selected and then click on one of the two list symbols in the editor's editing menu. Indentations must be defined manually using the corresponding icon in the editing menu. In the case of numbered lists, this causes the automatic adjustment of partial numbering. Instead of numbers, other characters (e.g. lower case letters) can also be used in numbered lists.
Unnumbered list:
- Element 1
- Element 2
- Element 2.1
- Element 2.2
- Element 3
Numbered list:
- Element 1
- Element 2
- Element 2.1
- Element 2.2
- Element 3
Lists (like paragraphs, images, tables, etc.) are numbered automatically so that they can be linked to directly. If the individual entries in a list are longer texts, it may be useful to assign a separate paragraph number to each individual element. In such a case (if the cursor is located within the respective list), the entry "Number list elements as separate paragraphs" can be selected in the "Edit" menu at the top.
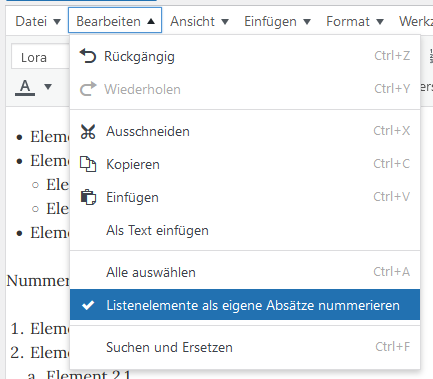
Menu item for the individual numbering of list elements
This leads to the following display of the list. If the above option were not selected, only a single paragraph marker would be created at the beginning of the list (see e.g. DEFAULT).
- Lorem ipsum dolor sit amet, consetetur sadipscing elitr, sed diam nonumy eirmod tempor invidunt ut labore et dolore magna aliquyam erat, sed diam voluptua. At vero eos et accusam et justo duo dolores et ea rebum. Stet clita kasd gubergren, no sea takimata sanctus est Lorem ipsum dolor sit amet.
- Lorem ipsum dolor sit amet, consetetur sadipscing elitr, sed diam nonumy eirmod tempor invidunt ut labore et dolore magna aliquyam erat, sed diam voluptua. At vero eos et accusam et justo duo dolores et ea rebum. Stet clita kasd gubergren, no sea takimata sanctus est Lorem ipsum dolor sit amet.
- Lorem ipsum dolor sit amet, consetetur sadipscing elitr, sed diam nonumy eirmod tempor invidunt ut labore et dolore magna aliquyam erat, sed diam voluptua. At vero eos et accusam et justo duo dolores et ea rebum. Stet clita kasd gubergren, no sea takimata sanctus est Lorem ipsum dolor sit amet.
7.3. Tables
Tables can be inserted via the corresponding menu item in the editor. Additional columns and rows can be added to an existing table at any time. Individual cells or several rows can be individually designed via the menu item "Cell or row properties > extended" (e.g. background colour, design of the lines). The width of the columns can and must be adjusted manually by clicking and holding on a vertical line and moving it horizontally.
To add an explanatory text to a table, the "Table caption" menu item must be used. The text must be inserted below the table. Each table caption is automatically preceded by the prefix "Table" and an automatically generated number, which is based on the number and sequence of several tables in a post.
| Column title 1 | Column title 2 | Column title 3 | Column title 4 |
| value | value | value | value |
| value | value | value | value |
Illustration of the design options of a table
7.4. Images
Images can be uploaded to the KiT media library via the "Add files" button above the editor window and integrated into the text (see DEFAULT).
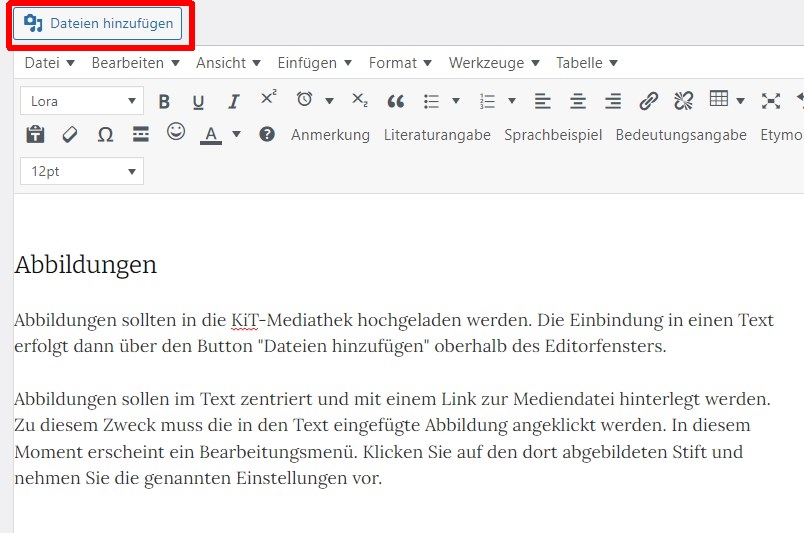
Inserting an image into a WordPress post
Illustrations should be centred in the text and provided with a link to the media file. To do this, click on the image inserted in the text. An editing menu will then appear. Click on the pencil shown there and make the above settings. Also replace the generic caption with a text that matches the image.
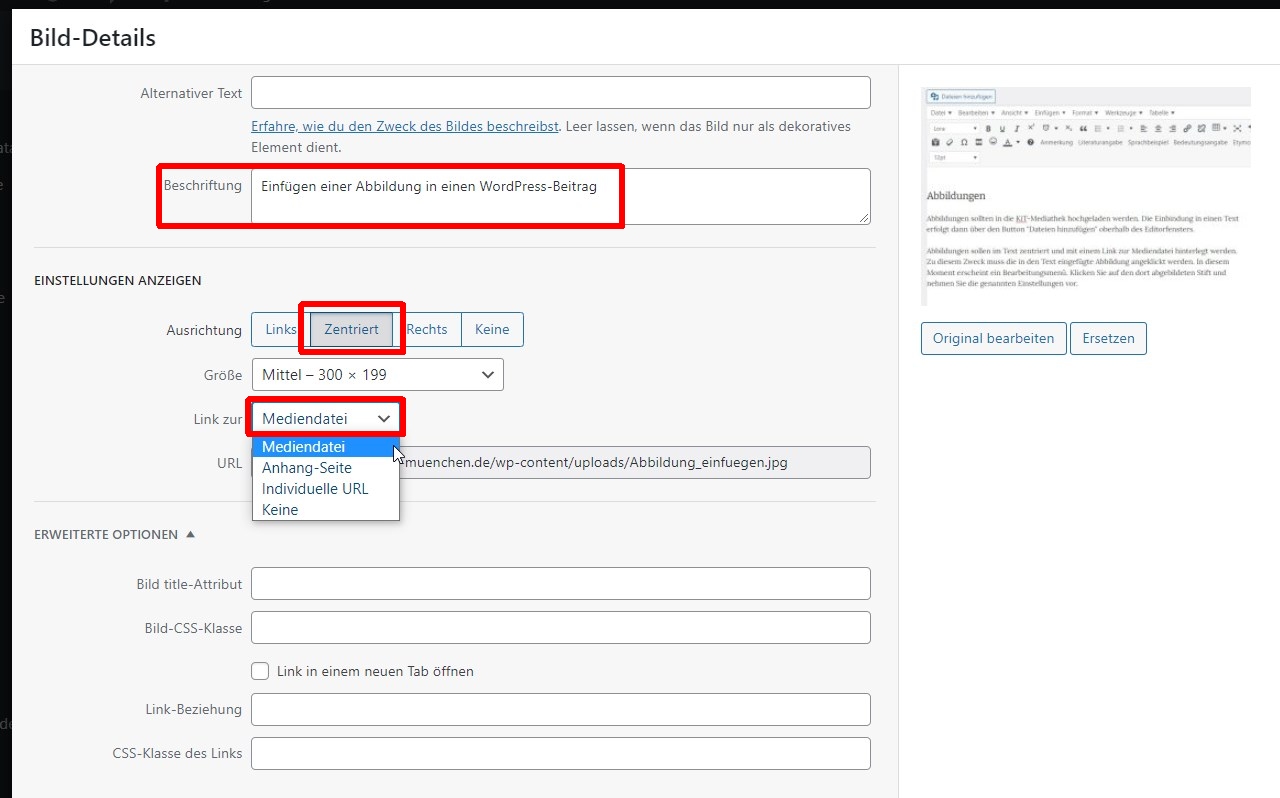
Formatting an image
The size of the illustrations should be moderate enough so that there is no disproportion to the surrounding text. Images that are too large can be reduced in size in the editor. To do this, first click on the image. Small white squares will then appear at the corners of the image. By clicking on these squares and dragging with the mouse button held down, the size of the images can be changed continuously.
7.5. Computer code
The "EnlighterJS" tool should be used to improve the readability of computer code within a post. The tool is called up via the menu item "{...}" in the editor menu. The tool allows you to select language-specific colour schemes that make it easier to read the respective program code (so-called syntax highlighting). EnlighterJS distinguishes between two 'modes' that can be selected in the tool's dialogue window: "Block code" and "Inline code". The former is intended for longer passages of computer code, the latter for short code passages within a sentence or line.
Example for "Block code":
<!DOCTYPE html>
<html lang="de">
  <head>
    <meta charset="utf-8">
    <meta name="viewport" content="width=device-width, initial-scale=1.0">
    <title>Titel der Seite | Name der Website</title>
  </head>
  <body>
    <!-- Sichtbarer Dokumentinhalt im body -->
    <p>Sehen Sie sich den Quellcode dieser Seite an.
      <kbd>(Kontextmenu: Seitenquelltext anzeigen)</kbd></p>
  </body>
</html>
Example of "inline code":
The statement select * from table1; returns all rows and columns of the table table1.
7.6. Internet links (URLs)
Internet links that are legible in the text are placed between angle brackets and additionally highlighted with the same link:
<http://www.kit.gwi.uni-muenchen.de/>
The same applies to e-mail addresses:
<KiT_signup@itg.uni-muenchen.de>
The "Edit" menu, which can be selected when clicking on a link inserted in the post, can be used to set whether the link opens in the same window or in a new window. Opening in the same window is the default and preferred setting.
7.7. Slashes and dashes
In texts, a distinction should be made between hyphens and dashes.
- Hyphen: - (https://www.fileformat.info/info/unicode/char/002d/index.htm)
- Dash (so-called 'en dash'): - (https://www.fileformat.info/info/unicode/char/2013/index.htm)
To avoid line breaks before or after a hyphen, a so-called "non-breaking hyphen" can/should be used: - (https://www.fileformat.info/info/unicode/char/2011/index.htm; can also be inserted as a so-called HTML entity via the text view of the editor: ‑)
The so-called "em dash" (https://www.fileformat.info/info/unicode/char/2014/index.htm) should only be used in exceptional cases. One such exception would be English-language texts, for example.
7.8. Inverted commas
KiT generally recommends the use of non-typographical standard inverted commas, both for single ('...') and double ("...") inverted commas.
' = https://www.fileformat.info/info/unicode/char/0027/index.htm
" = https://www.fileformat.info/info/unicode/char/0022/index.htm
However, authors can opt for the following typographical variants:
German inverted commas: „...“ (without spaces)
„ = https://www.fileformat.info/info/unicode/char/201e/index.htm
“ = https://www.fileformat.info/info/unicode/char/201c/index.htm
‚ = https://www.fileformat.info/info/unicode/char/201a/index.htm
‘ = https://www.fileformat.info/info/unicode/char/2018/index.htm
English inverted commas: “...” (without spaces)
“ = https://www.fileformat.info/info/unicode/char/201c/index.htm
” = https://www.fileformat.info/info/unicode/char/201d/index.htm
‘ = https://www.fileformat.info/info/unicode/char/2018/index.htm
’ = https://www.fileformat.info/info/unicode/char/2019/index.htm
French inverted commas (guillemets): « ... » (with space)
« = https://www.fileformat.info/info/unicode/char/00ab/index.htm
» = https://www.fileformat.info/info/unicode/char/00bb/index.htm
‹ = https://www.fileformat.info/info/unicode/char/2039/index.htm
› = https://www.fileformat.info/info/unicode/char/203a/index.htm
Italian inverted commas: «...» (without spaces)
« = https://www.fileformat.info/info/unicode/char/00ab/index.htm
» = https://www.fileformat.info/info/unicode/char/00bb/index.htm
‹ = https://www.fileformat.info/info/unicode/char/2039/index.htm
› = https://www.fileformat.info/info/unicode/char/203a/index.htm
There must be consistency within an article. The same applies to monographs consisting of several contributions by one and the same author, but not to anthologies with contributions by several authors.
7.9. Brackets
In the case of nesting parentheses, the following scheme applies:
( ... text ... [ ... text ... ] ... text ... )
An even deeper nesting of parentheses should be avoided at all costs. The following applies in mandatory cases:
( ... Text ... [ ... Text ... { ... Text ... } ... Text ... ] ... Text ... )
7.10. Multi-element abbreviations
For multi-element abbreviations such as u.a., v.a., e.g., o.ä. and so on, no space is placed between the elements (as "e.g.", not "e.g.").
8. Maps
Maps are created with the map shortcode. The following parameters are available for this:
- lat: Geographical latitude
- lng: Geographical longitude
- zoom: Zoom level. Integers between 0 and 28 are permitted
- width: Width of the map (optional). CSS length dimensions are permitted, for example 80% or 500px. Default value: 100%
- height: Height of the map (optional). CSS length dimensions are permitted, for example 80% or 500px. Default value: 300px
- background: Background map (optional). There are currently two options: os (OpenStreetMaps map) and carto-light (light-coloured map that is relatively suitable for printing). Default value: os
Markers are specified using the marker shortcode within the map shortcode, i.e. between the opening [map]] and the closing [/map]. Markers can have the following attributes:
- lat: Geographical latitude
- lng: Geographical longitude
- symbol: Symbol type (optional). There are three possibilities:
- Geometric shapes. Allowed are square, triangle, hex (hexagon) and circle.
- Text. Text is specified as the symbol type. The actual text is specified via an additional "text" attribute (see below)
- Numbers. All (positive) numbers are permitted. The number is displayed in a circle that becomes (logarithmically) larger the larger the number is.
If no symbol type is specified, the marker is displayed as a square.
- colour: Symbol colour (optional). CSS colours are permitted, for example English colour names (blue, green, red, yellow etc.) or hexadecimal values (#ff0000, #ff00ff etc.). Default value: red
- size: Size of the symbol (optional). Specifies the radius of the geometric shapes or the text size for text. For numbers, this attribute specifies the "starting size" of the circles, i.e. the size of a circle with the value 1. default value: 10
- text: Text (optional). Only useful for markers with the type "text". Specifies the actual text that is displayed on the map
- border: Thickness of the border (optional). Only used for markers with geometric shapes. Positive numerical values are permitted. If the value is 0, the symbol is displayed without a border. Default value: 2
Everything between the opening [marker]] and the closing [[/marker] is displayed in a speech bubble when you click on the marker. Not only text is possible, but also any formatting, images, etc.
Markers can also be generated using data from a database. Examples can be found here (detailed documentation will follow).
The following example gives an overview of the possibilities of the map:
[map lat="51.226623" lng="12.065641" zoom="7" height="500px"]
 [marker lat="50" lng="10" symbol="1" color="green"]Test[/marker]
 [marker lat="50" lng="10.5" symbol="2"]Test[/marker]
 [marker lat="50" lng="11" symbol="3"]Test[/marker]
 [marker lat="50" lng="11.5" symbol="4"]Test[/marker]
 [marker lat="50" lng="12" symbol="5"]Test[/marker]
 [marker lat="51" lng="10" symbol="99"]Test[/marker]
 [marker lat="51" lng="11" symbol="100"]Test[/marker]
 [marker lat="51" lng="12.5" symbol="2000"]Test[/marker]
 [marker lat="51" lng="14" symbol="5000"]Test[/marker]
 [marker lat="52" lng="10" symbol="square" color="green"]Test[/marker]
 [marker lat="52" lng="11" symbol="hex" color="yellow"]Test[/marker]
 [marker lat="52" lng="12" symbol="circle" color="yellow"]Test[/marker]
 [marker lat="52" lng="13" symbol="square" color="blue" size="20"]Test[/marker]
 [marker lat="52.5" lng="10" symbol="text" color="purple" size="35" text="Text2"]Test[/marker]
 [marker lat="52.5" lng="12" symbol="text" color="orange" size="20" text="Text"][/marker]
[/map]
9. SQLtoHTML
KiT offers the option of integrating content from MySQL databases directly into WordPress posts published on KiT. This is made possible by the WordPress plugin SQLtoHTML developed at the ITG.
To do this, a so-called "slug" must first be created in the plugin's configuration form, which contains the data required to access the database (address of the server, port number [normally 3306], user ID, password). The "default logins" created by the publishers can be used by all users; additional personalised slugs can be created under "User Logins".
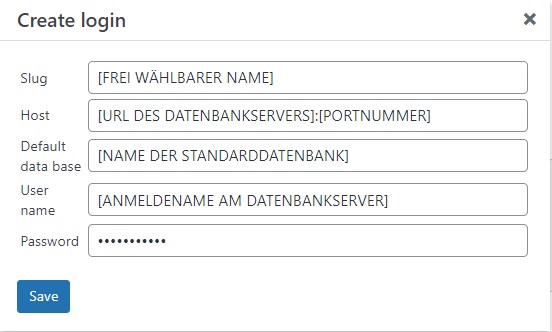
Form for creating a new "slug"
The integration of database content into a WordPress post is then carried out using the following syntax, which must be inserted into the text of the post at the desired position in the backend (preferably via the "Text" tab of the editor; in "visual" mode, disruptive HTML elements can be inserted into the shortcode, especially in the copy/paste process, which prevent its functionality):
[sql login="NAME_DES_SLUGS " db="NAME_DER_DATENBANK" query="SQL-ABFRAGE" height="250px" width="100%"]
The name of the slug must be entered for "login=". If a database other than the one specified as the default in the slug is to be queried, the corresponding database must be specified as the optional parameter "db=". After "query=" is the SQL statement to be executed. Only select statements can be used. The syntax must not contain line breaks. Example (the bold sentence has no functional meaning):
[sql login="kit_demo" db="tools" query="select concat(lemma, ' (', paragraph, ')') as Lemma, content from Georges where lemma like 'abeo';" height="250px" width="100%" font-size="10px"]
Instead of the code, the result of the SQL query entered after "query" appears in the frontend in the form of a table. The parameters "height" and "width" influence the size of the element in which the result table is displayed, while the font size within the table can be controlled with "font-size". If necessary, scrollbars are displayed to show areas of the table that are not initially visible:

If the optional parameter "single" is specified, the query result is not output in table format, but can be integrated "inline" into a text/sentence. Example:
Backend:
The Latin hand dictionary by Karl-Ernst Georges comprises a total of [sql login="kit_demo" db="tools" query="select count(*) from Georges;" single="1"] lemmas.
Frontend:
The Latin hand dictionary by Karl-Ernst Georges comprises a total of
If the query result contains more than one cell, the content of the top left cell of the table is displayed as the result.
10. iFrames
The shortcode [iframe]] allows the integration of entire webpages and videos in window form in KiT contributions. If an iFrame is to receive a signature, this must be inserted via the menu item "iFrame signature". The iFrame signature is automatically numbered. Attributes:
- src: URL of the embedded website
- width: Width of the iFrame
Examples:
[[iframe src="https://www.youtube.com/embed/wDchsz8nmbo?start=11"][/iframe]
Example of an iFrame
[iframe src="https://www.verba-alpina.gwi.uni-muenchen.de/" width="300px"][/iframe]
Another example of an iFrame (VerbaAlpina)
The use of iFrames is associated with the risk that web pages included there may be changed or even disappear completely or that their address may change. The use of DOIs is unfortunately not possible in iFrames.
11. Preview and publication
If you click on "Preview" in the top right-hand corner, you can see a preview of the article. Once the article has been finalised, the editors of the series must be informed, who will then publish the article.
12. Versioning
KiT articles and volumes can and should be versioned. Versioning is carried out by the editors and is a condition for the public publication of the article or volume. By creating a version, the current status of a contribution is 'frozen', as it were. Each version is consecutively assigned a unique number. This number can be used in the KiT URLs, for example.
Example of a URL for a post version:
http://www.kit.gwi.uni-muenchen.de/?p=8083&v=75
References to content in KiT contributions should always refer to versioned versions of contributions. This is the only way to ensure consistency. The concept of versioning is comparable to the creation of a new edition in book printing.
KiT URLs without the version parameter always refer to the most recent version of a contribution. If, for example, content is removed in a new version, such URLs can point to nothing. When referencing KiT posts, URLs with the version (v=) should therefore always be used.
The parameter v=0 in a KiT URL always refers to the non-versioned working version of a contribution (example: http://www.kit.gwi.uni-muenchen.de/?p=8083&v=0). This is only accessible to registered KiT users after login, so corresponding URLs should not be used for referencing.
To reference versioned KiT contributions from outside, you can use the URLs under the headings and paragraph numbers (white in a grey square to the right of the first line of each paragraph):
Examples:
Reference to the chapter "Preliminary remarks" in this article:
https://www.kit.gwi.uni-muenchen.de/?p=1833&v=1#chapter:vorbemerkungen
Reference to paragraph 5 of this article:
https://www.kit.gwi.uni-muenchen.de/?p=1833&v=1#p:5
13. Revisions
WordPress creates so-called revisions when you click on the "Update" button, which can be displayed via the "Revisions -> Show" menu item in the "Publish" dialogue box on the right-hand side of the editor window. In the list of revisions, older versions of the edited post can be restored by clicking on the corresponding button.
14. Licensing
All contributions and content published on KiT are generally licensed under the Open Access licence CC BY-SA in the latest valid version, currently 4.0 International (https://creativecommons.org/licenses/by-sa/4.0/). Authors who publish on KiT agree to the application of this licence to their contributions. In well-founded individual cases, other licences may also be applied to individual contributions and content, preferably CC licences, which must always be as close to Open Access-compliant licences as possible. The degree of proximity to Open Access licences is based on this scheme:
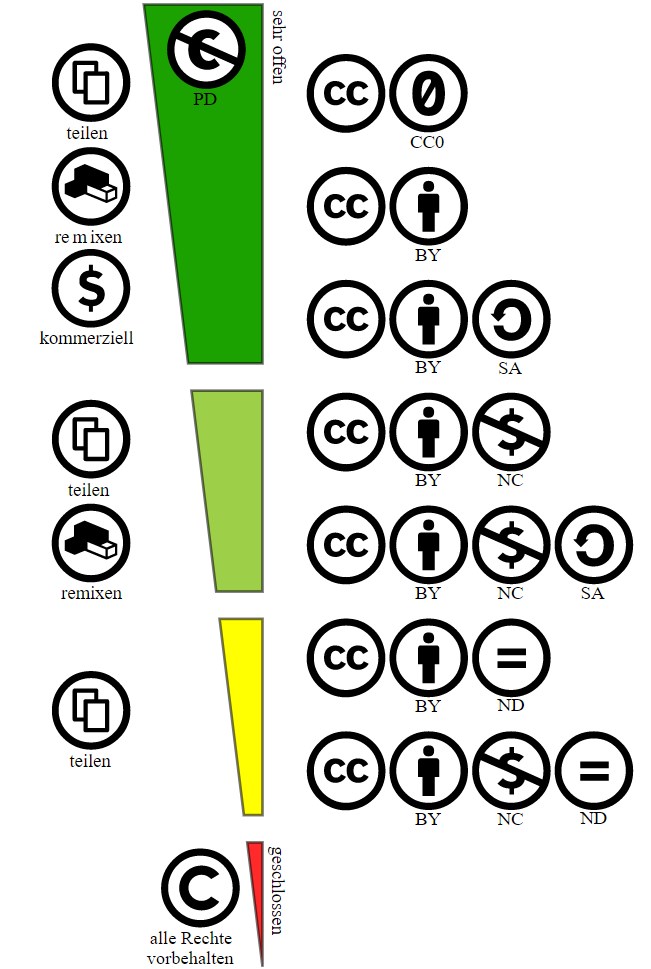
Creative Commons licence spectrum. Only the top three licences are considered to be fully Open Access compliant. (Source of the graphic: Wikipedia, licence: https://creativecommons.org/licenses/by/4.0/deed.en)
If a licence other than CC BY-SA is to be used, this must be agreed with the publishers. In such cases, a corresponding note will be added to the front end of the articles and/or volumes concerned.
For the licensing of media files used in KiT contributions, see the section "Licence regulations regarding media files" above.
Bibliography
- Dixon 1994 = Dixon, Robert MW (1994): Ergativity, Cambridge; New York, Cambridge University Press.
- Dixon 2009a = Dixon, Robert M. W. (2009): Basic Linguistic Theory 2. Grammatical Topics, New York, Oxford University Press.
- Hopper/Thompson 1980 = Hopper, Paul J. / Thompson, Sandra A. (1980): Transitivity in Grammar and Discourse, in: Language, vol. 56, 2, 251-299.
- Krefeld a = Krefeld, Thomas: Digital Humanities. VA-de 16/1, Methodologie. [Abgerufen am: 21.12.2016] (Link).
- Maldonado 2007 = Maldonado, Ricardo (2007): Grammatical Voice in Cognitive Grammar, in: Geeraerts, Dirk / Cuyckens, Hubert (Hrsgg.), The Oxford Handbook of Cognitive Linguistics, Oxford, Oxford University Press.